
Tour of React Native in 2024
Happy new year everyone! It’s a day into 2024 and I’m already back at work on the blog.
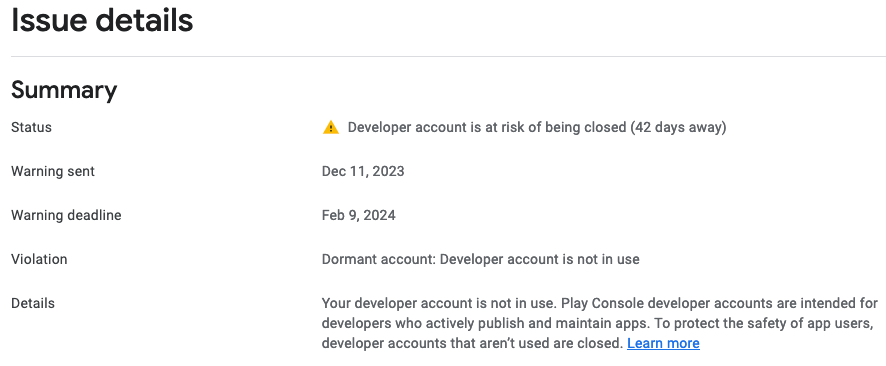
I wasn’t planning to spend my holidays making a phone app, but with no travel planned and Google holding me ransom, that’s somehow what I ended up doing.
In this post I’m not explicitly sharing what exactly the app does. Instead I’m presenting some technical notes and my experiences in building it. The reason is that it’s still under review in the app stores, and I’d like to announce it “officially” when there’s actually something to announce.
Naturally, I wouldn’t be surprised if you can make a pretty accurate guess about what the app does based on prior knowledge of its author and clues from the details I’m sharing.
Call to Action: Do you want to beta test this app? I’d be interested to hear your feedback! It’s quite simple and you could cover all of its functionality in under 5 minutes.
Technical Introduction
As alluded to in the title of the post, this app I made is written with React Native, the JavaScript-based mobile framework that lets you run the same code on both Android and iOS. For context, the last time I had touched React Native was in 2021, on the Oculus mobile app (now renamed Meta Quest), the one that connects to VR headsets and lets you buy games and send chat messages.
At the time, I remember feeling surprised that such a crucial app was written in JavaScript, but the more I think about it the more I become convinced that it's clearly the best choice. Writing an Android app or an iOS app on their own might be easier than React Native, but writing one of each and dealing with keeping them in feature sync is undoubtedly more work than a single codebase, even if a few edge cases require platform-specific changes.
Thus, the tech choices were made: thanks to Google, I was going to make a mobile app for my idea, and thanks to Meta, I was going to write it in React Native.
So what is it like to start a project in React Native in 2024?
The answer: refreshingly easy!
A platform called Expo comes with pre-configured tooling that lets you jump straight into writing the app, rather than dealing with all the faff of mobile environment setups. Of course, that’s their hook, and once they have you on board they default you to building through their managed web service.
Interesting Details
Like most apps, the bulk of the project is made up of code that routes the user between different screens, shows various buttons in pretty colours, and lists data in scrolling views.
However, there are a couple of interesting spots in the app I’d like to share.
Charting module with reactive split
Back in GPX Replay, I had written code to render shading on the elevation graph to follow the current replay position. Well, for this app, I had a similar requirement.
I wanted to let the user swipe a cursor through their activity and see recorded metrics like heart rate, elevation, speed, and power. React Native has a few community libraries that make it at least mostly straight-forward to render a line chart. However, none that I found had something like this shading functionality built-in.
It may have been possible to recreate the effect by rendering the chart as two datasets with different line colours: one before the cursor, and one after.
But redrawing an SVG-based chart each time we move the cursor is a lot of extra work to do for our poor phones. Thus, I implemented a familiar solution by
calculating a percentage of the graph and drawing a divider line at the right spot.
// 64 and 32 are the margins of the chart axes, determined by inspection
<View
  style={{
    position: "absolute",
    left: 64 + (chartWidth - 64) * splitPercent,
    top: 32,
    bottom: 32,
    width: 2,
    opacity: 0.7,
    backgroundColor: colors.primary,
  }}
/>
n.b.: the 64 and 32 in the comment are coupled to the code!
Authorisation Redirect Server
Linking with Strava means going through the Authorization Code flow defined in OAuth 2.0. Have you thought about what happens when you log in to a service with Google or Apple?
Without getting too technical, I’ll summarise the process:
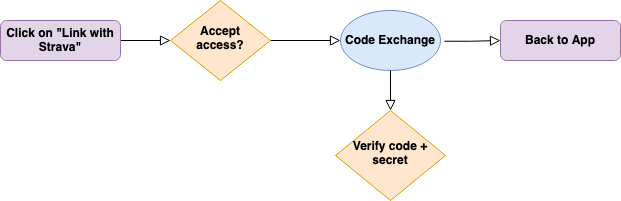
- You click the button on the app or web site
- You’re taken to the authorisation provider (Google, Apple, Strava, etc.) to confirm the access
- You’re redirected back to the app successfully
Between steps 2 and 3 there lies a hidden step. Namely, how can the underlying service know that the access request is coming from a client it knows about? To address this issue, we introduce the idea of a client secret. This secret is some special password which is shared between only the app owner and the authorisation service owner.
If this secret were leaked, then someone could impersonate the app and do evil things (that look like they came from the allowed app).
On Strava, evil things could include deleting your activity history or downloading your GPS data to figure out where you live and where you've traveled. No good!
Thus, between 2 and 3 lies an important code exchange half-step:
- The authorisation provider redirects you to the web site with a special authorisation code
- The app or web site exchanges this authorisation code plus the client secret with the authorisation service for an access token (this token is what lets the app act using your identity)
This step is normally invisible unless you’re paying close attention to the redirects that are happening in your browser!
The Catch
The problem with code exchange for mobile apps is that if the client secret is known on the app, an evil individual could dig through the compiled code and find it.
To fix this issue, I host the code exchange on a server I own, where the secret is stored. If you allow permission from Strava for my app, you’re not immediately sent back to the app. Instead, there is a quick round trip back to San Jose for this token exchange. Of course, the quickness depends on where you live! But the speed of light is certainly enough to keep the wait reasonable unless you leave the planet.
Troubleshooting
Why, Strava?
For my app, I needed GPX files of tracked activities. Strava, which is the most popular source of these activities, has an “Export GPX” button on the web interface from an activity. However, the API, which the app uses, lacks this function. Instead, you query activities and receive a stream of points in JSON format.
The answer in this case is to construct a GPX file from these points. In the end this is only a small issue, but it’s somewhat perplexing that they clearly have the functionality available, yet they do not offer it to developers.
Expo Auth Module on Android
Now here’s a trouble that kept me busy for an entire day.
After I’d gotten all the features working on the iOS simulator, I decided to do some testing on the Android side. That’s when I discovered that the Expo Auth module’s promptAsync function simply does not function on Android.
In theory and in iOS, the function returns a response object after the authentication completes which contains the access token and other API information. On Android, I found that this function always returned a dismiss object, regardless what happens in the authentication stage.
After digging through StackOverflow posts, forum threads, and a still-open 127-comment-long 2-year-old GitHub issue, the only way I found to fix the issue was to hack a temporary listener onto the deep linking system (only on Android). This function listens for the deep link that the authentication server uses to send the browser back to your app and parses the necessary parameters from that directly, ignoring the outcome of the promptAsync.
useEffect(() => {
  // workaround android bug (https://github.com/expo/expo/issues/12044), so if not android, skip
  if (Platform.OS !== "android") {
    return;
  }
  const handler = async (event: Linking.EventType) => {
    // See: https://github.com/expo/expo/issues/12044#issuecomment-889031264
    handleAuthResponse(event.url);
  };
  const subscription = Linking.addEventListener("url", handler);
  return () => {
    subscription.remove();
  };
}, []);
That's all for now; once this app is ready you can expect I'll share that here too!
In other news
- How are your holidays going? Do you have any new year resolutions? Telling someone makes them more likely to come true!
- Do you remember Code Couplet? If you’re in the mood for something new this year, how about trying it out to improve your comments and write better code? VS Code extension download
- A couple months back, on my bike trip to Slovenia, I complained that I could not share videos on my blog posts from my phone. So when I came back, I submitted a fix upstream to the Ghost blogging software.
- In another case of Google ransom, I will be updating my browser extensions Tab Origin and Text Rewriter to the new extension manifest version before the deadline (which by the way keeps getting shifted back, so who knows…). If you have any feature requests for these extensions, now is the time to let me know!
View Comments