Technical dive into Streetwarp
Here I'm going to expand on the streetwarp I introduced in a previous post. Not that anyone asked for this, but in any case I might appreciate it some day.
Let's break the problem of turning GPX tracks into videos into three parts:
- Getting the input (load GPX track/Strava activity/Ridewithgps route)
- Turn the input into the output (gpx to video)
- Output the... output (play the video)
2. GPX to Video
When I started, I actually began from the middle part, which is the biggest chunk of work and represents an independent problem on its own. Taking a piecewise approach, the program has to 1) get images for points along the route, 2) select which images to put in the video, and 3) generate the video from those images. Along the way, some interesting complexities emerged. 🧐
- Fetching images for points: GPX files are just lists of GPS points, so it seems obvious to just query Google Streetview at each point and call it a day. But quickly it became apparent that GPX files are not created equal. Some only place a GPS point to mark a change in direction. Others from GPS watches will have a point generated at every second or two regardless of the distance traveled between them. If we don't put some thought into this issue, we'd end up with videos that have an uneven speed; for example if you're on a run and stop at a red light, then the constructed video would show the same image for several seconds. The trick I applied here was to normalize the GPS routes by generating a bunch of intermediate points along the route, and then use metadata requests (which are free!) to remove duplicated frames. Note: just remember when interpolating that the Earth is a sphere so we can't linearly place dots by latitude/longitude. We use the Haversine formula for a more accurate calculation. 🌎
        points
            .iter()
            .zip(points.iter().skip(1))
            .flat_map(|(p1, p2)| {
                p1.haversine_intermediate_fill(
                    p2,
                    p1.haversine_distance(p2) / (factor as f64),
                    /* include ends */ false,
                )
                .into_iter()
            })
            .collect::<Vec<_>>()
- Selecting frames for the video: Luckily for me, I had some familiarity with the well-known hyperlapse algorithm that solves exactly this problem of optimizing the smoothness of an accelerated video (aka timelapse). So I just needed to follow the recipe and implement it. 👨🍳 If you're curious, I suggest taking a look at this jupyter notebook which demonstrates each individual step of the algorithm with visualized examples.

The most difficult part here actually wasn't the algorithm; rather it was packaging everything in a way that lets it run on AWS Lambda. - Generating the video: incant ffmpeg 🧙♂️
1 and 3. Input and Output
Grouping these together because they're both handled by the web server. This is the standard node js express thing, not much going on there. This takes care of the chores of the app: receiving input files, communicating progress, talking to AWS, and playing the results.
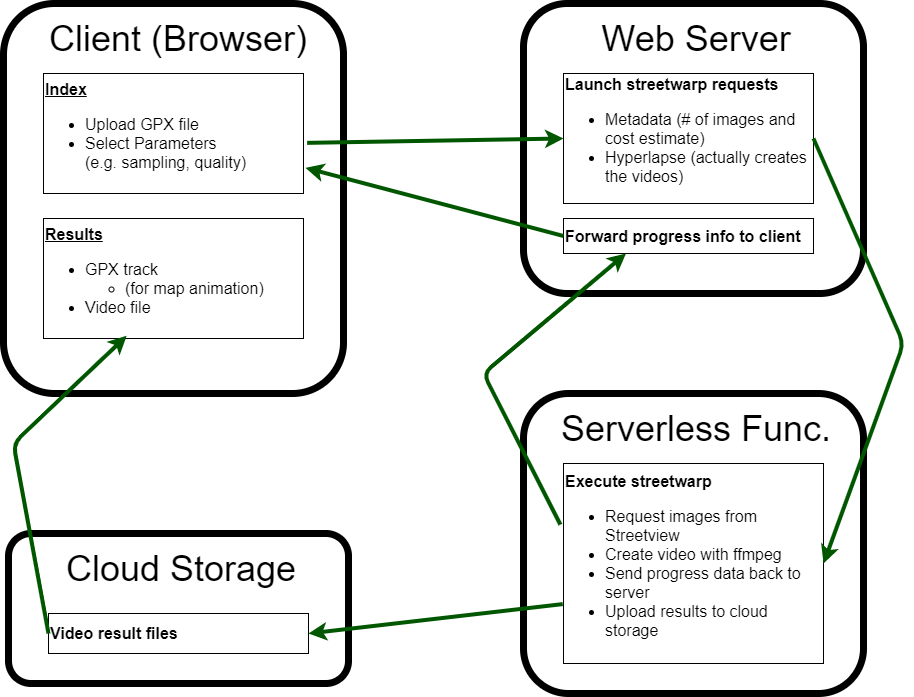
If you're a diagram person, I've sketched a rough diagram of how the parts talk to each other.
View Comments